
Have you ever looked through your cupboard or stood in your pantry wondering what to make? Well, recently I stood in the basement pantry looking around and realized I’ve still got a bunch of butternut squashes stored from last summers’ bounty.
Butternut squash…. I’ve roasted it, made galettes, cooked it with pasta, and combined it with whole grains and citrus.
So what to make?
Butternut is so sweet, it almost begs for something salty. OH! I just packed up a nearly 6 lbs of home cured & smoked bacon. Perfect!
And what goes more with bacon more than eggs? Then it hit me…
Butternut and Bacon Quiche!
Bacon, eggs, and butternut. Appropriate for any meal, breakfast, lunch or dinner!
Quiche is one of those dishes that is infinitely adaptable. Make a crust, and if you’ve got eggs and cream, all you need to do is add whatever you have on hand. The ultimate humble pie, quiche is simple and satisfying.
If you don’t want to bother making the crust from scratch, feel free to use a pre-made frozen crust. Also, don’t get too hung up on exact measurements of bacon or squash, a bit more or less either way won’t ruin the dish.
Here’s how I did it.
Butternut and Bacon Quiche
Serves 8
INGREDIENTS
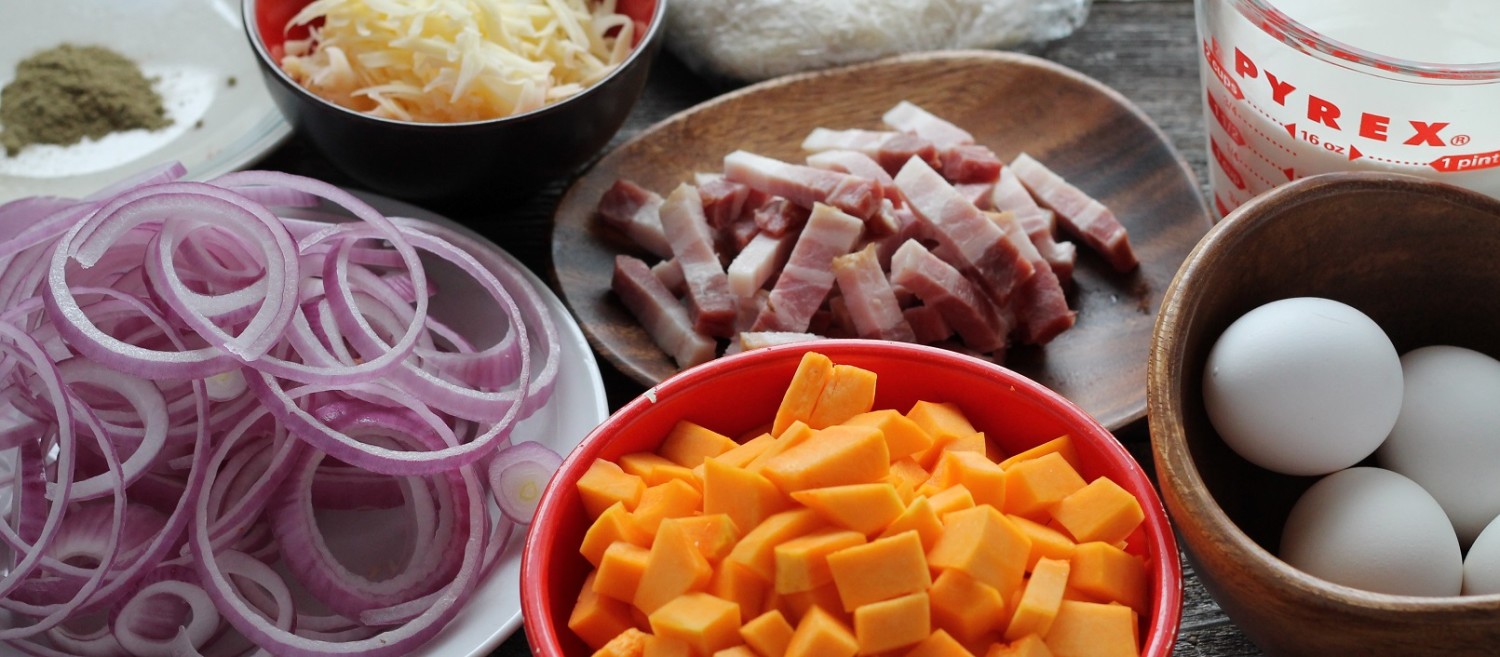
4-1/2 ounces (130 g) thick cut bacon cut into 1/2″ (1 cm) wide pieces
1 small butternut squash peeled, seeded and cubed – about 3 cups (375 g)
1 medium to large red onion (180 g) onions sliced
1 cup (130 g) cheese grated – use cheddar or any other cheese you like, I used smoked cheddar
1 tablespoon (15 ml) oil (if needed)
Pinch of salt
4 large eggs
1 cup (250 ml) milk
1 cup (250 ml) cream
1 teaspoon (1 g) dried sage powder
1 teaspoon (1 g) white pepper or to taste (the bacon and cheese have enough salt)

METHOD
- Check that the oven is empty* then preheat oven to 375 F (180 C or Gas Mark 4)
- Roll out pastry dough on a lightly floured surface with a flour rolling pin until about 13″ (33 cm) in diameter
- Put into 9-1/2″ (24 cm) round deep dish pie pan, or in in my case into a 10″ (25 cm) cast iron skillet
- Prick the bottom all over with a fork, and line the pan with aluminum foil or parchment paper
- Add pie weights, (or dried beans, rice or lentils) and place pan into the oven
- Bake for 20 minutes, remove from oven, carefully remove weights and foil/paper and return to oven for another 10 minutes or until crust is golden brown.
- Remove from oven, and place on a rack to cool.
- Keep oven on.
Prepare the filling
- While crust cooks, cook the bacon in a medium pan over medium heat stirring occasionally until tender crisp, not dried out – about 8 to 10 minutes.
- Remove bacon from pan with a slotted spoon and drain on plate covered with paper towels.
- Add the onion slices to the same pan you cooked the bacon,, add pinch of salt and a grind of pepper, and cook , stirring
 often until onions become limp and start to turn translucent.
 - Turn off the heat and add the cubed butternut squash to the onions, toss to coat with fat (add up to an additional Tablespoon (15 ml) oil if needed. You want the squash and onions coated but not dripping.
- Add the dried sage and salt, to the squash onion mixture, and stir to evenly distribute.
- Transfer squash onion mixture to a rimmed cookie sheet . Spread it out into a single layer. You want it to roast and brown, not steam.
- Place oiled and seasoned squash and onions into the hot oven.
- Bake for 25 minutes or until tender and slightly browned. Stir after 10 minutes.
- Remove squash and onions from oven and set aside to cool slightly.
- In large bowl whisk together eggs, milk, cream, cheese and white pepper.
- Pour egg mixture into baked pie shell, and top with bacon, butternut and onions.
- Place filled pan into oven and bake until browned and puffed, about 35-45 minutes. The center will not be completely set, but should not be liquid either.
- If edges of crust start to brown too much use some foil to protect the edges.
- When cooked, remove from oven, and set on rack to cool for 10 minutes before slicing.
This dish takes a little time, but is worth it. Perfect for breakfast during the winter holidays, for brunch with a cool green salad, or even for dinner.

Until next time, Eat Well and Keep Digging!
*My mother gave me three great pieces of advice. The first is “Do your best.” The second is “Always lay your clothes out the night before.” The third is “Before preheating the oven, check to make sure it is empty.” Seems obvious right?
Back in college – in the mid 1980’s, I was getting ready to cook dinner for my then girl-friend. As a student, using the oven was a rarity, food usually involved dialing for take-out pizza or a ramen noodle package. Anyway, I was getting ready to roast a chicken, and had to light the stove as it had not been used in a long time. I opened the oven door and there in the bottom was something strange. Like a plastic lollipop with a metal stick, it quickly became clear that someone had left a screwdriver in the bottom of the oven while it had been in use. How no one noticed it or how long it had been that way I had no idea. But I’ve never forgotten that. So, even if you’re sure, always check the oven before you preheat it!
You Might Also Like


January 13, 2013
I often make things up out of the ingredients I have in the cupboard now that I have so many ingredients. This looks great and I have squash and home cured bacon too and I do love quiche!
January 14, 2013
Thanks Becky, I could see pumpkin and ham quiche as well. That’s the beauty of a deep pantry. It gives so much flexibiity.
January 14, 2013
Now that’s a winning combination! And one of those, why didn’t I think of that?! I’ve made a frittata with butternut squash so I’m definitely getting how fabulous this must taste. I’m thinking that your mother’s tip on checking the oven should be given to all college kids as I’ve heard a few of these stories from my daughter’s friends!!
January 15, 2013
I had to look up the difference between a quiche and a frittata. While a quiche may or may not have a crust, a frittata does not, and a quiche has cream or milk while the frittata doesn’t. Cousins of the culinary world. Both delicious!
January 14, 2013
Great idea, Dave, especially the part where the squash/onion are roasted. That must bring a great flavor to the quiche. Funny about the screw driver. Lucky you learned the lesson while in college, on someone else’s stove. How many people have I heard that melted something in their own ovens? You only do it once. 🙂
January 15, 2013
Roasting the veggies gives them a sweetness and depth a flavor I don’t think you’d get otherwise.
January 15, 2013
Hi David, thanks for planting an idea. The only recipe I have for butternut is in a soup; otherwise I don’t know what to do with it. Sqash/pumkin is not really that popular over here and you don’t hear of many ways to prepare them.
But I do make quiche; especially with carots and ground cumin or with leeks. I tend to avoid cream in my quiche. Instead I use one heaped tbs of corn starch (Maizena, but I don’t know its US equivalent).
Cheers
January 16, 2013
Ms. Bougie, Thanks for the compliment! Check around on the site, there are several recipes for butternut squash and / or pumpkin.
January 17, 2013
I love quiche. I’ve tried it so many different ways. This looks just delicious.
January 17, 2013
Thank you Susie, it was delicious. Thanks for coming by and I hope to see you again.